Everything you need to know about pods…
What is CocoaPods
"CocoaPods is the dependency manager for Swift/Objective-C projects. It has thousands of libraries and can help you scale your projects elegantly." via http://cocoapods.org
Essentially, it helps you incorporate 3rd party libraries, frameworks, into your product without worrying about how to set them up and configure your project, which at times could be a huge pain.
Why Pods ? Why not Git ?
• Since libraries are 3rd party so you will have to download and copy them to your project every time there is a new version? Lets say, you have 10 libs or frameworks in your project, now imagine the time it will take you to check if anyone of them has any new version that you want to update? and Worst if something does not work, you need to revert back to previous version? It does take time and is a nuisance, with CocoaPods you simply type pod update and updates the ones that have newer versions available.
• Now If you want v1.1 of one particular library? How easy would it be for you to skim through Git commit history to find out which one you need? With CocoaPods, you simply say pod 'AFrameworkLib', '1.1'
• Every lib requires setting up your project with a certain set of configuration to make them work, doing it for 10 or so libraries and then fixing conflicts is pain in itself. With CocoaPods, its taken care of automatically.
 • Last but not least, you have to include licenses for all 3rd party libraries you are using to provide credit to original developer of that library. Imagine copying 10 license docs and making sure they are up to date? CocoaPod automatically creates an acknowledgement file in your project that you can simply include somewhere appropriate.
How pods work ?
Dependencies are listed in a pod file. When pod update/install command is fired, listed pods get installed and CocoaPods creates a new project file i.e. .xcworkspace file in which all your pods are listed. This makes it easier to use, but also less error proof.
How to install pods ?
Installation of pods is very easy and this is something that makes pods so popular. You can install pods in 4 easy steps.
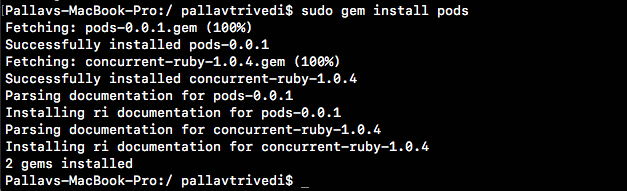
Install gems : Fire [sudo gem install pods] from terminal and gems would be installed.
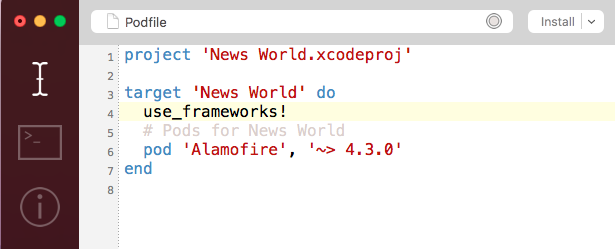
Make a pod file: Either make a text file named Podfile in your project directory using terminal or use cocoa pods application and add pods to your application.

Search for the pod to be added: Search for the name and version of the pod you want to add on cocoapods.org
Add the pod and version in pod file: You need to mention the dependancy of the pod that you need to add in pod file you just created. This can be done using any editor (preferably use cocoa pods application)
Click Install: Either fire the command [pod install] or click on the install button in cocoa pods application and the mentioned dependancies would be installed.

Done. Just start using the workspace created by cocoa pods and instead of xcodeproj file. Mentioned dependencies have been added to your project.

How to remove installed pods ?
Earlier it was a mess to remove the installed pods from Xcode project. Just deleting the pod file and directory was not enough. You need to remove the pod resources, embedded pod frameworks and few other stuffs from build phases. But cocoa pod application has made this job quite easy. All you need to do is a click “Remove cocoa pods from a project”. This would remove all the pods from the selected project. In case you need to remove some particular pods, just remove them from the pod file and fire the command pod update. Holla.. its done.
Podfile.lock
Every time we use [pod install] or [pod update], a podlock file is made ( or updated). It keeps track of all the pods installed along with the versions. Thus it helps in source control. Moreover, podfile.lock is of great use when work is being done in a team. Because of podfile.lock, the other guy using your project will get the same version you are using until he updates. Installation will not check for the newer version until you make the change in podfile.lock
This video from GoogleDevelopers explains the concept: https://www.youtube.com/watch?v=H-zK1mEwTe0

Making your own pod and publishing it to cocoapods.org
Like installing the existing pods, creating your own pod and making it available for the world to use is also damn easy. Let us look the entire process in detail.
Make a git repository and clone it: All the project files that you need to include in your pod must reside at git or at some reachable location by cocoapods (discussed in detail in podspec section). For ease, make a git repository and clone it in some directory at your Macbook.
Push the code to master: Create a Xcode project in your directory (the one which you cloned), code, and push you code to origin. (This can be done either using git commands on terminal or using tools like source tree etc).
Add a podspec file: For making a pod, a podspec file must reside in your project directory. We will discuss about this file later. To create it, navigate to your project directory in terminal and fire the command pod spec create NameOfThePod
We also need to mention about the swift version which we are using for our code. This is done by creating a .swift-version file. Create it using echo “3.0” >> .swift-version
Commit the changes to origin and your repository should look like this.

Create a release for your product: Click on the release button and create a release for your product with version 0.1.0 (or whatever convention you wish to use).

Edit the podspec file: The existing podspec file would be having lots of variable along with proper documentation. However, all of them are not necessary. Replace the code in podspec file with below code
Pod::Spec.new do |s|
s.platform = :ios
s.ios.deployment_target = '10.0'
s.name = “Name of the pod”
# For example,
# s.name = “InterestCalculator”
s.summary = “Summary for the pod”
# For example,
# s.summary = “Something about your pod”
s.requires_arc = true
s.version = “0.1.0"
s.license = { :type => "MIT", :file => "LICENSE" }
s.author = { “Your Name" => “Email Id" }
# For example,
# s.author = { “Pallav Trivedi" => “pallavtrivedi03@gmail.com” }
s.homepage = “Link to your repository homepage”
# For example,
# s.homepage = “https://github.com/pallavtrivedi03/InterestCalculator”
s.source = { :git => "https://github.com/pallavtrivedi03/InterestCalculator.git", :tag => "#{s.version}"}
s.source_files = "InterestCalculator/*.{swift}"
end
These variables supply necessary information to CocoaPods.
Please refer https://guides.cocoapods.org/syntax/podspec.html#group_root_specification for details on podspec syntax.
Please refer https://guides.cocoapods.org/syntax/podspec.html#group_root_specification for details on podspec syntax.
Linting the Project : Before you can make your pod live, you need to lint your project.

Basically this step checks for any errors and verify that there’s nothing wrong with the project. Linting the project is extremely easy. All you need to do is fire the command [pod lib lint] in the terminal.
Once your pod passes validation, it is ready to be published.
Publish the pod: In order to publish your pod, you need to have a trunk account. The word account is confusing because all you need is to create a session (cocoapod calls it trunk account). To create a session, you just need to fire this command in terminal
pod trunk register <Email> <Name> - - description=‘macbook pro’
A link would be mailed to you, clicking to which your session would be activated. This is what you see after clicking the link.
A link would be mailed to you, clicking to which your session would be activated. This is what you see after clicking the link.

Pushing your Pod: This is the last step and easiest of all. Now that linting of your pod is successful, trunk session has been created, you just need to push the pod by following command.
pod trunk push NameOfPod.podspec

Congrats, your pod is now accessible by the world.

No comments:
Post a Comment